Managing Minimum (Min), Target and Maximum (Max) Stock Levels on a product/depot
Learn how to effectively manage the minimum, target, and maximum stock levels of a product or depot, ensuring optimal inventory control and avoiding stockouts or overstock situations.

Written by Ian Oldrey
Updated at January 11th, 2024
Table of Contents
For managing the stock levels for a depot stock holding within a product (product/depot) there is a screen to manage the different levels.
Within this screen you can review historic stock levels, purchases and sales and manipulate the way that the Min, Target and Max stock levels are set, triggering low stock warnings and building suggested reordering requirements.
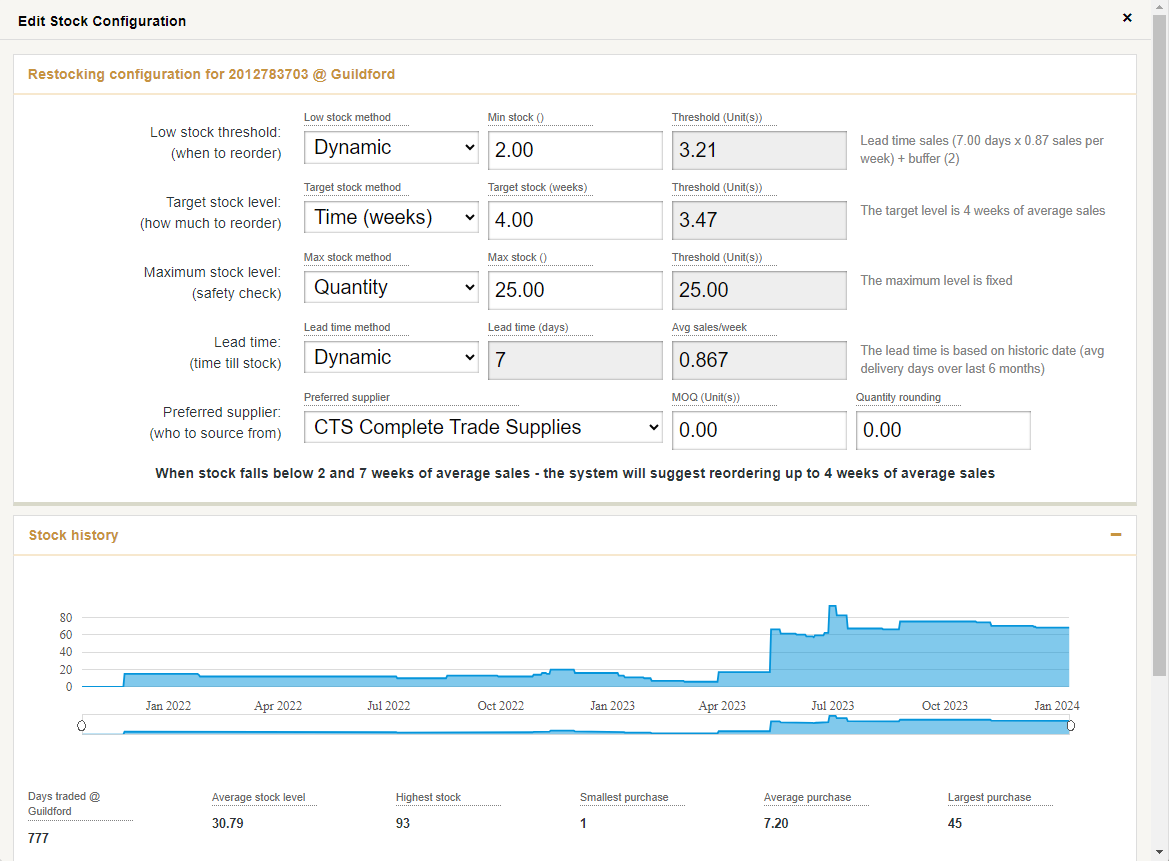
There are a number of ways to get to this screen, check out this article to see how best to get to edit the stock configuration
This screen is laid out logically Min/Target/Max/Lead Time/Supplier, which makes it easy to read, but when setting or editing a product it is sometimes easier to work on these fields in reverse sequence. Therefore the following sections are in that order:
Step 1 - Review historic figures
At the bottom of the page are 4 sections you can review to see the historic trading patterns for stock of this product at this depot.

Stock history
This shows the last 24 months stock level of this product at this depot. The movement of the line on the graph may show a pattern of lots of little purchases or sales, frequent or irregular trading.
 Below the main graph is a timeline summary with a small handle that can be pulled in from the two ends to focus the graph on a more specific part of the trading period.
Stock figures
There are useful summary statistics to aid building a picture of the trading of this product, based on the quantities:
- Days traded at depot
- Average stock level
- Highest stock
- Smallest purchase
- Average purchase
- Largest purchase
Purchase & Sales/Return/Milling history
There are two group boxes at the bottom of the page that can be expanded to show a table of the sales/purchases for this product at this depot.
Step 2 - Preferred Supplier
From the dropdown it is possible to select the preferred supplier for this product. A product can have multiple potential suppliers, but only one preferred supplier. This is the supplier that the system will nominate to raise replenishment purchase orders against by default.

The MOQ (Minimum Order Quantity) can be set and will be used as a minimum for a purchase if stock is required to replenish back to target stock levels.
Quantity rounding is used for measured products (timber, steel, aggregates) and unit items that are ordered in boxes/pallets/etc. to round the purchase quantity to a sensible order quantity. For example a product may come in boxes of 10, the suggest reordering calculates that you need 67 to return to target stock, but it will be rounded to 70 (7 x 10 boxes).
Step 3 - Lead Time
The lead time is the days between placing a purchase order and the goods being received into the depot. All calculated lead times use the last 6 months worth of trading data.
There are three ways to set this figure:
Dynamic Lead Time
This looks at the full purchasing history for the product and uses the average lead time across all those purchases. This is useful once there are a number of months trading history in the system and if the product is often sourced from a variety of suppliers.
Supplier Lead Time
This looks at the purchasing history for the Preferred Supplier and uses the average lead time across their purchase orders. This is useful once there is a trading history with this supplier and if they have different lead times to the other potential suppliers of this product.
Manual Lead Time
This is the ability to manually set a predicted number of days lead time. This is useful before there is any trading history, or if you know the supplier is getting better/worse than the historic data would suggest.
Average Sales Per Week
This is a calculated field based on the last 6 months work of sales
Step 4 - Maximum Stock Level
This is an optional figure to add into the stock levels. It is a top level over which you would prefer the stock not to go to prevent over investing in stock that is slow selling.
You can set the Max stock level by several methods:
- Quantity - Manual entry of a quantity you don't want the stock to go over
- Value - A manually entered financial figure you don't want to go over. This will reduce the Max quantity if a product becomes more expensive per item
- Volume - A manually entered volume (for Timber) that you don't want stock to go over
- Time - The maximum number of weeks worth of stock you wish to hold based on average weekly sales
- None - No max figure is set
Step 5 - Target Stock Level
This is the figure that the suggested reordering will endeavour to get the stock back to with a replenishment purchase order.
You can set the Target stock level by several methods:
- Quantity - Manual entry of a quantity you want the target stock level to be
- Time - The target number of weeks worth of stock you wish to hold based on average weekly sales
- Maximum - Sets the Target and Max stock to be the same figure. Setting the Maximum criteria will set both figures
- None - Set the target stock order by order
Step 6 - Low/Min Stock Level
This is the figure below which a low stock warning is triggered and a suggested replenishment purchase order can be raised.
You can set the Min stock level by several methods:
- Low Quantity - Manual entry of a quantity you want the Min/Low stock level to be
- Dynamic - this is a formula (Lead time x Sales per week x manual buffer) Adding a figure to the min stock field will add the manual buffer to the lead time and sales per week figures.
- Time - The minimum number of weeks worth of stock you wish to hold based on average weekly sales
- None - Ignore the min stock (will not give a low stock warning)
Dynamic is ideal to use if there are good lead time and average sales figures to work with as it keeps the stock live based on the historic patterns and adjusts the requirement to restock based on recent activity. It does not account for seasonal trends, or one off large orders which can bias the figures. If this is likely to apply to a product use the manual (Low Quantity) figures.